

How To Connect A Solar Panel To An Existing Geyser

Connecting a solar panel to your existing geyser is an excellent way to reduce electricity bills and make your home more energy-efficient. Solar water heating uses sunlight to warm your geyser’s water supply, allowing you to rely less on grid power. Whether you have a conventional electric geyser or a modern one, integrating solar panels can significantly improve efficiency.
- Understanding How Solar Heating Works
A solar water heating system works by converting sunlight into heat energy, which is then used to warm water stored in your geyser. There are two main types of systems:
- Direct system: Water from the geyser circulates through the solar collector, heating directly from sunlight.
- Indirect system: A heat transfer fluid (like glycol) absorbs solar heat and transfers it to the water through a heat exchanger inside the geyser.
In both systems, solar panels or collectors mounted on the roof absorb sunlight and channel it into your water system.
- Tools and Materials You Will Need
Before starting, gather these materials:
- Solar panels (photovoltaic or solar thermal collectors)
- Solar water heating controller (for electric geysers)
- DC cables and connectors
- Temperature sensors
- Water pipes and fittings
- Non-return valves
- Circulation pump (for indirect systems)
- Insulation materials for pipes
Having the correct tools ensures safety and proper connection for long-term efficiency.
- Safety and Preparation
Before connecting the solar system, switch off the geyser’s power at the main circuit breaker. Allow the water in the geyser to cool down completely before making any adjustments. Choose a sunny location on your roof for the solar panels, ensuring they face north (in the southern hemisphere) for maximum sunlight exposure.
It is recommended to get assistance from a qualified solar installer or electrician if you are unfamiliar with electrical and plumbing systems.
- Steps to Connect Solar Panels to a Geyser
- Mount the solar panels.
Install the solar collectors or photovoltaic panels on the roof using sturdy brackets. Make sure the panels are tilted at an angle that maximizes sun exposure throughout the day. - Connect the panels to the circulation system.
For thermal systems, connect pipes from the collector outlet to the geyser’s hot water inlet and the collector inlet to the geyser’s cold water outlet. Install a circulation pump if necessary to move water between the geyser and collector efficiently. - Install a non-return valve.
Place a non-return valve between the collector and the geyser to prevent hot water from flowing back into the solar collector when the temperature drops at night. - Connect the solar controller.
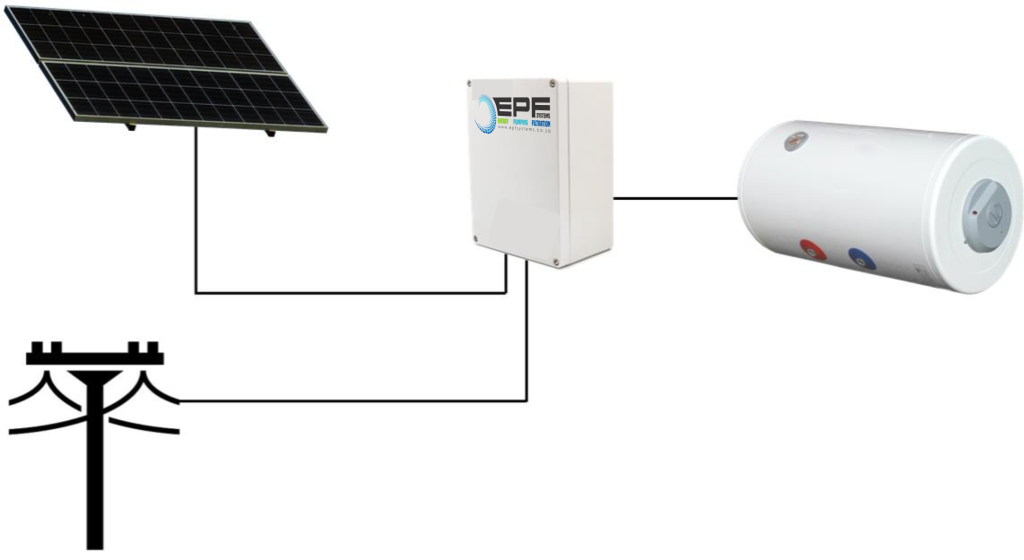
If you are using photovoltaic (PV) panels to power your electric geyser, wire the solar panels to a solar controller. The controller regulates electricity flow from the solar panels to the geyser’s heating element. - Wire the geyser element.
Connect the solar controller output to the geyser’s thermostat and heating element. Ensure the polarity is correct and all connections are well insulated to prevent electrical faults. - Install temperature sensors.
Fit sensors at the geyser outlet and solar collector to monitor water temperature and control heating cycles automatically. - Insulate pipes and wiring.
Wrap hot water pipes and exposed cables with insulation material to reduce heat loss and improve efficiency. - Test the system.
Turn on the geyser and check if water is heating properly. Monitor the system for any leaks, unusual noises, or electrical faults.
- Troubleshooting Common Issues
- Water not heating: Check if the solar panels are receiving direct sunlight and that the circulation pump (if used) is operating correctly.
- Geyser overheating: Ensure the thermostat is correctly set and the solar controller is functioning.
- Water flow issues: Inspect the pipes for blockages and confirm that the non-return valve is installed correctly.
- Maintenance Tips
Keep your solar panels clean and free from dust or debris for maximum sunlight absorption. Inspect pipes and electrical connections every few months for wear or leaks. Drain and flush the system annually to remove sediment buildup that can reduce efficiency.
- Benefits of Solar-Connected Geysers
By connecting a solar panel to your geyser, you can save up to 40–60% on electricity bills. It also reduces your carbon footprint and ensures hot water availability even during power outages when paired with a battery backup system.
Also Read: How To Clean Pewter