

How To Connect DStv Extra View

DStv Extra View allows you to link two or more decoders under one subscription, giving your household access to multiple channels on different TVs at the same time. This setup is especially useful for families who want to watch different shows without paying for extra subscriptions. Setting it up may look complicated, but once you understand the connections, it becomes straightforward. Here’s how to connect Extra View properly.
- Understand How Extra View Works
Extra View works by linking a primary decoder and one or more secondary decoders using a communication cable or via a Smart LNB (Low-Noise Block) if you have a newer installation. The primary decoder controls the account and sends viewing rights to the secondary decoders.
You pay only one subscription fee, with a small additional charge for each secondary decoder connected.
- Check Decoder Compatibility
Before you start, make sure your decoders are compatible with Extra View. Most modern DStv models support the feature, including the Explora, HD decoders, and Single View decoders.
Typical combinations include:
- Explora as the primary decoder with HD or Single View as secondary.
- Two Explora decoders connected via a Smart LNB.
If you’re unsure about compatibility, check the decoder manual or contact DStv customer care.
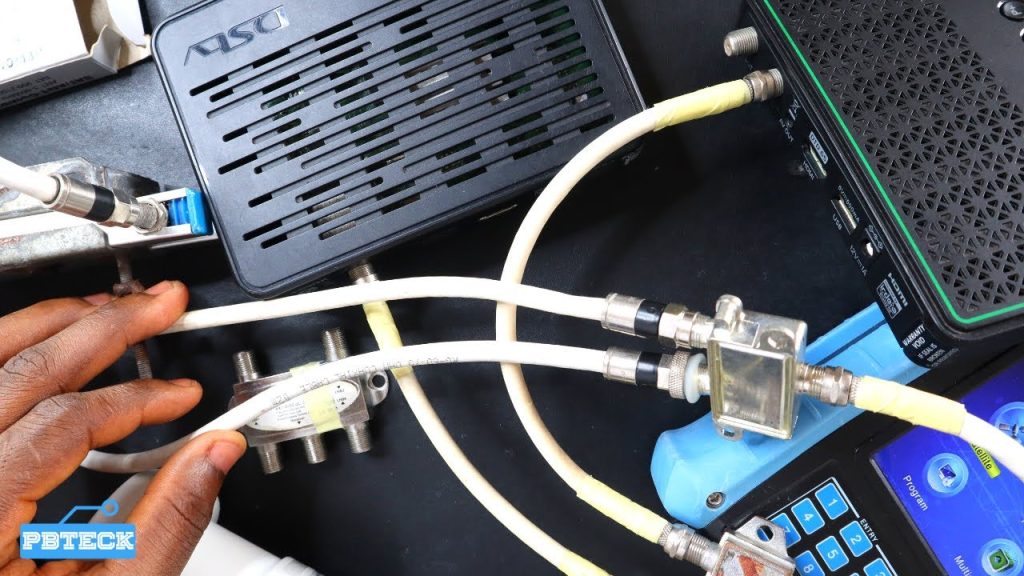
- Gather the Required Equipment
To connect DStv Extra View, you will need:
- Two decoders (primary and secondary)
- A Smart LNB or a universal twin LNB
- RG6 coaxial cable
- F-type connectors
- A splitter or diplexer (if required for older setups)
Using a Smart LNB simplifies the process because it handles both signal and communication between decoders without the need for a separate heartbeat cable.
- Choose the Connection Method
Option 1: Using a Smart LNB
This is the most common and reliable method for modern DStv installations.
Connect both decoders to the Smart LNB using RG6 cables. The Smart LNB will automatically send the communication signal (called the “heartbeat”) between them. Make sure both decoders are receiving a strong satellite signal.
Option 2: Using a Heartbeat Cable (for older setups)
If you have an older installation with a twin LNB or universal LNB, you’ll need a separate heartbeat cable.
Connect one end of the coaxial cable to the RF Out port on the primary decoder and the other end to the RF In port on the secondary decoder. This cable carries the heartbeat signal that keeps both decoders linked.
- Configure the Decoders
Once connected, you’ll need to set up Extra View on the decoders:
On the primary decoder, go to Menu → Settings → Satellite Settings → Home Network. Ensure the “Send Heartbeat” option is turned on.
On the secondary decoder, navigate to Menu → Settings → Satellite Settings → Home Network, and ensure it’s set to receive the heartbeat signal.
If you’re using a Smart LNB, the system usually detects and configures the settings automatically.
- Activate the Extra View Service
After making all the connections, you need to activate Extra View through DStv. You can do this in several ways:
- Dial 12068584# on your phone and follow the prompts.
- Use the MyDStv app to manage decoder settings.
- Contact the DStv call centre or visit a DStv service centre.
Provide the smartcard numbers of both decoders and request for Extra View activation. The system will then link your decoders under one account.
- Test the Connection
Once activation is complete, check that both decoders are working properly. If the secondary decoder shows an “E143 – Communication Error,” it means it’s not receiving the heartbeat signal.
Double-check the cable connections or ensure that the Smart LNB is correctly set up. If you’re still having issues, restart both decoders and run the setup wizard again.
- Maintain a Stable Connection
Keep your cables secure and ensure the dish alignment stays stable to avoid signal loss. If you use a Smart LNB, avoid connecting more decoders than it supports, as this can weaken the signal.
Regularly check your account to make sure both decoders remain linked under the same subscription.
Also Read: How To Clean A Throttle Body Without Removing It