

How to Draw a Cell Phone Tower

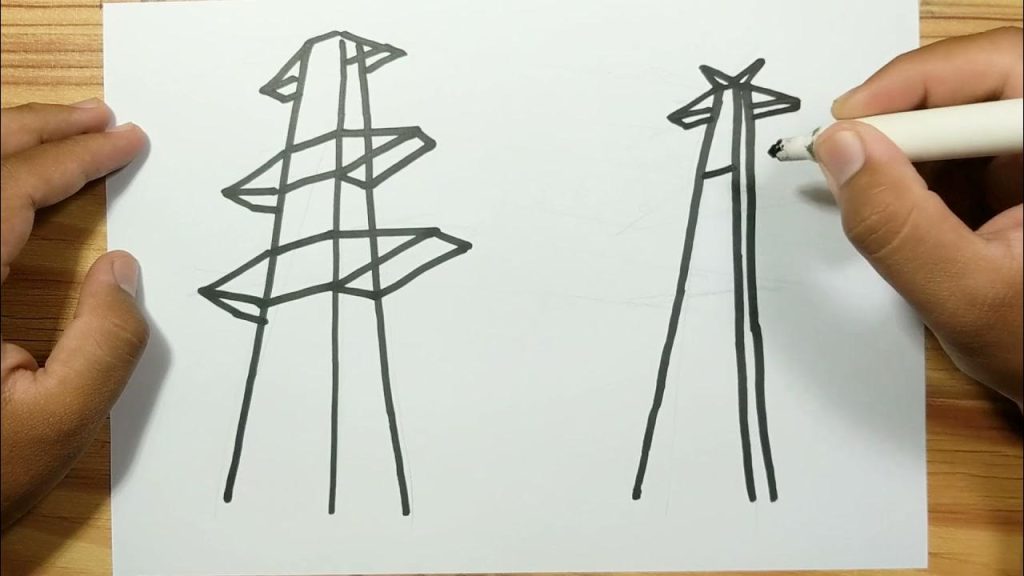
Drawing a cell phone tower may seem challenging at first because the structure is tall, detailed, and technical. However, once you break it down into simple shapes and understand how real towers are constructed, the process becomes far easier. The goal is to capture the tower’s height, its repeating frame, and the antennas that give it purpose. With a clear approach, you can create a drawing that looks strong, realistic, and carefully engineered. This guide explains how to observe the tower’s basic form, build its structure, add technical elements, and refine the sketch until it resembles the towers you see along highways and in open fields.
- Understanding the Shape of a Cell Phone Tower
A cell phone tower is built from a repeating geometric frame that narrows slightly as it rises. Most are triangular or square in structure, creating a tall silhouette that looks stable and uniform. Before you begin sketching, picture the tower as a series of stacked sections sitting on top of each other. This mental outline helps you map the drawing and gives your final sketch a realistic foundation because you are working from a clear shape rather than random lines.
- Building the Main Frame
Start with a light outline of the tower’s body. Let it stand tall on the page with straight sides and an even width that narrows gradually toward the top. Think of the tower’s frame like a ladder made of repeating levels. Each section sits on the previous one, and the structure rises evenly. At this stage, focus only on placing the overall frame. Keeping the lines soft allows you to adjust angles and spacing before adding detail.
- Adding the Diagonal Support Beams
Inside the main frame, sketch the diagonal beams that crisscross between the vertical supports. These beams are vital in real towers because they strengthen the structure against wind. In your drawing they create interesting texture and help define the tower’s engineering style. Keep the direction of the diagonal lines consistent across each level so the tower looks symmetrical and balanced.
- Shaping the Platform and Upper Structure
Most cell phone towers have a platform near the top where equipment can be installed. Draw a slim horizontal platform or railing that wraps around the tower a little below the highest point. Above this platform, allow the tower to continue rising in a narrower segment that holds the antennas. Keeping this upper portion small gives the tower a convincing sense of proportion.
- Drawing the Antennas and Dishes
The antennas are what make the tower instantly recognisable. Add long rectangular antenna panels around the top, with two or three visible depending on the angle. Tilt them outward slightly to show how they extend from the tower. If you want to add more technical detail, place a few shallow round dishes on one or two sides. These details give your tower a realistic industrial look without overcrowding the drawing.
- Refining Lines and Creating Realism
After placing all the elements, refine your lines so the frame looks strong and clean. Erase stray marks and sharpen the diagonal beams. Add gentle shading along one side to create depth because metal structures reflect light in simple gradients. Light cross-hatching can add texture without making the drawing too heavy. Finish by grounding the tower with a hint of its surroundings such as grass, equipment boxes, or a fence.
- Bringing Everything Together
When you step back, the tower should look tall and engineered with the repeating rhythm of beams and antennas that define modern telecommunication structures. With practice your drawings will become more confident as you learn to recognise patterns in real towers and translate them onto the page. Each tower you draw will sharpen your understanding of structure, perspective, and clean line work, helping you create designs that feel solid and believable.
Also Read: How To Delete Incognito History