

How To Draw A Sandwich

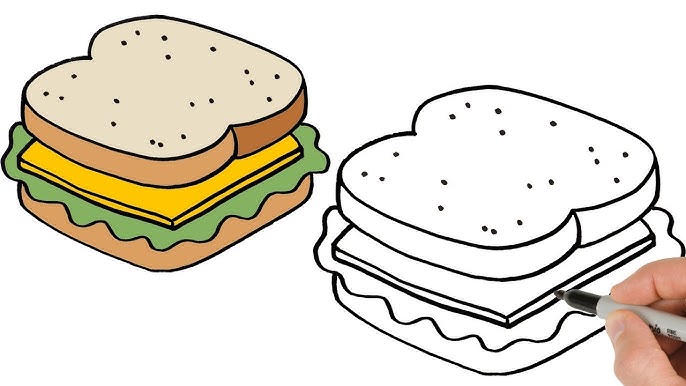
Drawing a sandwich is a fun and easy way to practice simple shapes, layers and textures. Sandwiches are made up of clear parts such as bread, fillings and toppings, which makes them perfect subjects for beginners and school projects. You do not need advanced drawing skills to create a sandwich that looks tasty and realistic. By focusing on the layers and keeping the shapes clean, you can draw a sandwich that is neat and appealing. This guide explains how to draw a sandwich step by step using simple forms and easy details.
- Start with the Bottom Slice of Bread
Begin by drawing the base of the sandwich.
- Draw a large rectangle with rounded corners.
- Keep the top edge slightly curved.
- Make the slice thick enough to support the fillings.
- Use light pencil strokes for easy adjustments.
This slice forms the foundation of your sandwich drawing.
- Add the Top Slice of Bread
The top slice completes the sandwich shape.
- Draw a similar rounded rectangle above the first slice.
- Leave a small gap between the slices for the fillings.
- Align both slices so the sandwich looks balanced.
- Slightly angle the top slice for a more natural look.
The two slices of bread define the sandwich clearly.
- Draw the Filling Layers
The fillings make the sandwich interesting and realistic.
- Draw wavy lines between the bread slices for lettuce.
- Add flat layers for cheese or meat.
- Vary the thickness of each layer.
- Let some fillings stick out slightly for a casual look.
Layering adds depth and makes the sandwich look delicious.
- Add Texture to the Bread
Bread texture gives your drawing more realism.
- Draw small dots or short curved lines on the surface.
- Add a thicker outline around the edges for the crust.
- Keep the texture light and evenly spaced.
- Avoid over-detailing.
Simple texture makes the bread recognizable and appealing.
- Refine the Fillings
Enhance the look of the sandwich layers.
- Add small folds and curves to the lettuce.
- Draw smooth edges for cheese slices.
- Add light lines to suggest meat texture.
- Keep each filling distinct.
Clear layers help the sandwich look neat and well-structured.
- Add Optional Details
Small extras can make your drawing more fun.
- Draw a toothpick holding the sandwich together.
- Add tomato slices or onions for variety.
- Draw a plate underneath the sandwich.
- Keep optional details simple.
These additions add personality without making the drawing complex.
- Finalize with Clean Lines and Light Shading
Finish your drawing by refining and adding depth.
- Darken the final outlines.
- Erase any extra sketch lines.
- Add shading under the top bread slice.
- Shade lightly between filling layers.
- Add a soft shadow under the sandwich.
Also Read: How To Draw A Protea