

How To Draw Feet

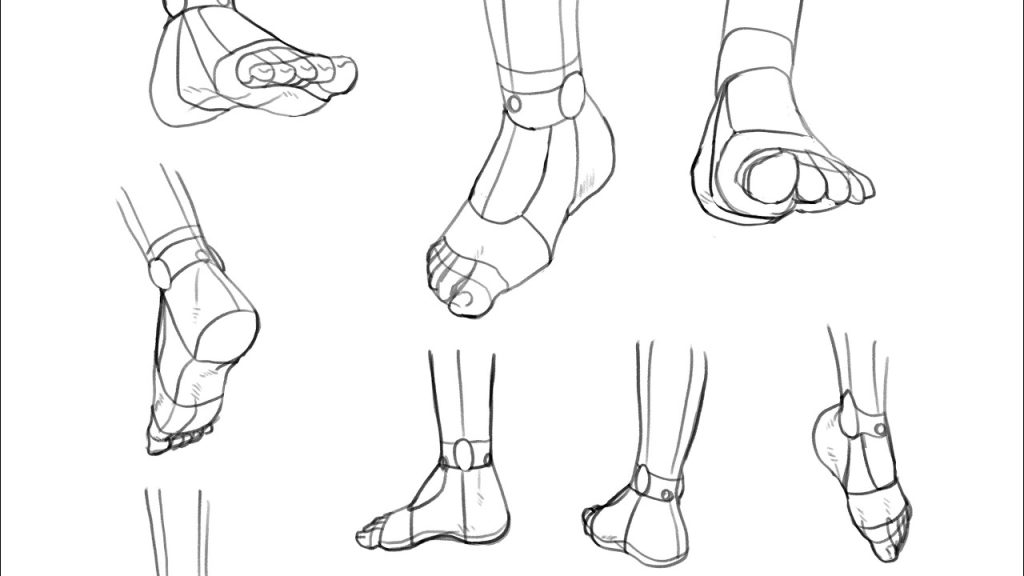
Drawing feet can feel challenging because they are complex and often overlooked, yet they play an important role in balance, posture and movement. Feet support the entire body, so when they are drawn well, a figure looks more realistic and grounded. The good news is that feet become much easier to draw when you stop thinking of them as complicated shapes and start breaking them into simple forms. By understanding basic structure, toe placement and angles, you can draw feet that look natural and confident. This guide explains how to draw feet in an easy and clear way for beginners and improving artists.
- Understand the Basic Foot Structure
Before drawing details, focus on the overall form.
- Think of the foot as a wedge or a flattened triangle.
- The heel is thicker and heavier than the front.
- The foot slopes downward toward the toes.
- Keep the shape simple at first.
Understanding the basic structure makes the foot easier to manage.
- Start with a Simple Block Shape
Begin by sketching the foot using basic shapes.
- Draw a rectangular or wedge-like shape for the main foot.
- Add a rounded shape at the back for the heel.
- Keep your lines light and loose.
- Focus on proportion rather than detail.
This block method helps you place the foot correctly.
- Add the Ankle and Leg Connection
The foot must connect naturally to the leg.
- Draw two short lines above the heel for the ankle.
- Make the ankle narrower than the foot.
- Slightly angle the ankle forward.
- Avoid placing the ankle directly in the center.
Correct ankle placement helps the foot look balanced.
- Shape the Top and Sole of the Foot
Now refine the main outline.
- Curve the top of the foot gently.
- Keep the bottom flatter for the sole.
- Add a slight arch on the inner side.
- Smooth out sharp corners.
These curves help the foot look natural and realistic.
- Draw the Toes as Groups
Toes are easier when drawn together.
- Draw the toes as a single curved line first.
- Divide the line into smaller sections for each toe.
- Make the big toe the largest.
- Gradually reduce the size toward the smallest toe.
Grouping toes prevents stiff and awkward results.
- Add Toe Shape and Separation
Now refine each toe.
- Round the tips of the toes.
- Add small gaps between them.
- Keep the toes slightly angled.
- Avoid making all toes the same length.
Natural variation makes the foot look realistic.
- Draw the Foot from Different Angles
Practice drawing feet in different positions.
- Side view shows the arch clearly.
- Front view shows toe alignment.
- Back view focuses on the heel.
- Raised or bent feet show flexibility.
Trying different angles improves confidence and accuracy.
- Add Light Details and Texture
Details should be subtle.
- Add light lines for knuckles at the toes.
- Draw a soft line for the arch.
- Avoid heavy wrinkles.
- Keep the skin smooth.
Too much detail can make the foot look older or stiff.
- Add Shading for Depth
Shading helps define form.
- Shade under the arch and toes.
- Darken areas around the heel.
- Keep the top of the foot lighter.
- Blend shading smoothly.
Shading gives the foot a three-dimensional look.
- Common Mistakes to Avoid
Avoiding errors improves your drawings.
- Do not draw toes as straight sticks.
- Do not place the ankle too far forward.
- Do not ignore the arch.
- Do not over-detail too early.
Being aware of mistakes helps you improve faster.
- Finalize with Clean Lines
Finish your drawing by refining everything.
- Darken the final outlines carefully.
- Erase unnecessary sketch lines.
- Check proportions and balance.
- Smooth out shading and edges.
Also Read: How To Draw Anime Hair