

How To Install Solar Panels And Inverter

How To Install Solar Panels And Inverter
Installing solar panels and an inverter is a great way to harness renewable energy and reduce electricity bills. While a licensed professional is usually recommended for full installations, understanding the process is helpful if you’re planning a small DIY setup or simply want to monitor work done by technicians. Here’s a clear guide on how solar panels and an inverter are installed.
- Assess Your Energy Needs
Before installation, calculate your average daily electricity usage. This helps you determine how many panels you need and the size of the inverter. Consider your roof space, sun exposure, and budget when planning your solar setup. - Choose the Right Components
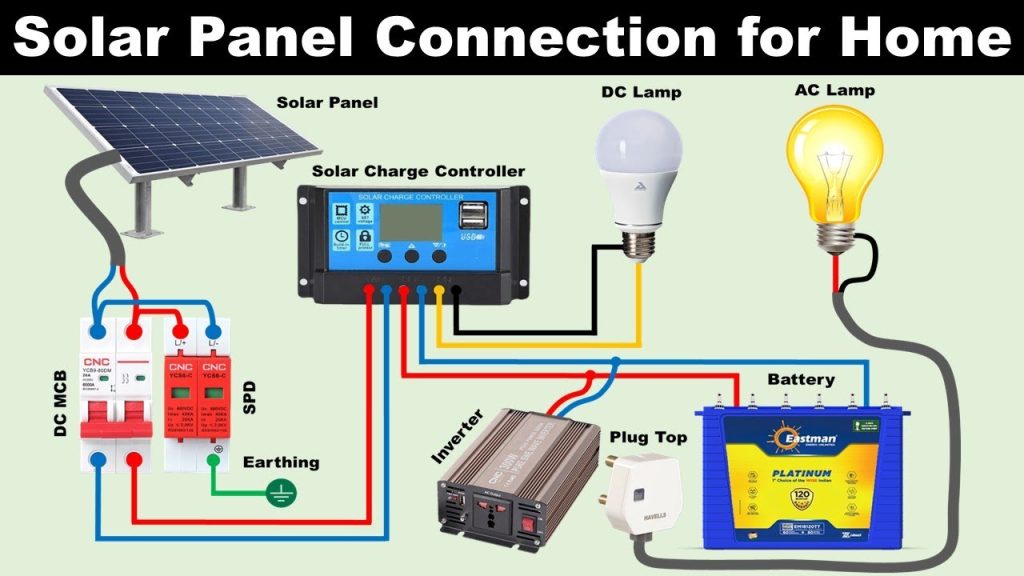
Purchase compatible equipment:
- Solar panels: monocrystalline or polycrystalline
- Inverter: converts DC power from the panels to usable AC power
- Mounting system: to secure panels to the roof
- Batteries (optional): for energy storage
- Charge controller: to protect batteries from overcharging
- Install the Mounting Structure
Secure the mounting structure onto the roof using brackets and bolts. Ensure the frame is tilted at an angle that captures the most sunlight—typically between 15 to 40 degrees depending on your location. The structure must be strong enough to withstand wind and rain. - Mount the Solar Panels
Once the frame is secure, attach the solar panels using clamps or screws. Align them neatly in rows and check that they’re tightly fixed. Connect the panels using MC4 connectors, following the manufacturer’s wiring guide. - Install the Inverter
Mount the inverter on a cool, shaded wall—indoors or in a protected outdoor box. For off-grid systems, also install the charge controller between the panels and battery.
- Connect the panels to the inverter: this carries the DC current
- Connect the inverter to the home’s power supply or battery: this allows AC power to flow into your home or grid
- Connect the Battery (if applicable)
If using batteries for backup power, connect them to the inverter via the charge controller. Always follow polarity correctly: positive to positive, negative to negative. - Ground the System
To protect against electrical faults or lightning, ground the system by connecting all metal components to an earth rod using grounding wire. - Test the System
Turn on the inverter and check the system readings. It should display the solar panel voltage, battery level, and power output. Verify that electricity is flowing into your home or storage.
Also Read: How To Grow Strawberries In Pots