

How to Recover Deleted Photos from iPhone After Emptying Recently Deleted
Few things sting as much as watching your memories vanish in a single tap. If you’ve just emptied your Recently Deleted folder on iPhone, it probably feels like you’ve sealed your photos’ fate. Apple designed it that way—gone means gone, at least on the surface.
But here’s the truth: those photos aren’t always gone forever. iPhones don’t instantly overwrite deleted data, which means with the right tool, you still stand a chance. That’s where recovery software enters the picture, and in 2025, one tool stands out for speed and reliability.
Why Photos Disappear After Emptying Recently Deleted
Apple’s Recently Deleted folder is like a temporary trash bin. Every photo you delete goes there first, waiting for 30 days before iOS wipes it automatically. It’s meant to be a safety net, a place for second chances.
But if you’ve already emptied that folder—or if 30 days have quietly slipped by—the iPhone treats those photos as expendable. They’re flagged for removal, and once new data starts filling in, recovery becomes trickier. That’s why timing matters so much in this process.
What You Should Try First (Before Using Recovery Software)
Even though it’s tempting to dive straight into advanced solutions, it’s worth giving the basics a shot. You never know—sometimes the simplest checks save the day.
Here are a few places to look:
- iCloud Photos: Log into iCloud.com and see if the images are still lingering there.
- iTunes or Finder Backups: If you synced your iPhone in the past, you might roll back to an older version.
- Shared Albums: Photos you’ve shared with friends or family sometimes survive even after mass deletions.
Still, let’s be honest—these methods only work if you had a backup in place. If you didn’t, or if the backup was outdated, the results are often disappointing. That’s usually the moment people realize they need something more powerful.
The Fastest Solution — Using Gbyte Recovery
When I tested different options to pull back erased photos, Gbyte Recovery proved itself again and again. It works differently from Apple’s safety nets: instead of relying on past backups, it dives deep into your iPhone’s storage to locate fragments of deleted files.


The Fastest Solution — Using Gbyte RecoveryThe scan itself is fast, often taking just a few minutes, and it previews what’s recoverable before you decide what to restore. That means no guessing, no scrolling through corrupted thumbnails, just a clean view of the photos you actually want back.
Plus, Gbyte offers flexible licensing: monthly, annual, or lifetime. So whether you only need it for one urgent recovery or want a permanent safety net, it adapts to your needs.
Key Features That Make Recovery Possible
What makes this deleted photo recovery tool stand out isn’t just speed—it’s the combination of smart scanning, cableless iCloud access, and a high success rate.
- Precise Scanning Engine: Finds recoverable fragments while filtering out broken files, saving you time and frustration.
- Cableless iCloud Recovery: Access and restore photos directly from iCloud without physically connecting your phone.
- High Success Rate: Even images that seemed permanently lost—high-res photos, old screenshots—were retrieved reliably during my tests.
These features work together to make recovery almost effortless, turning a stressful situation into something surprisingly manageable.
Step-by-Step Guide to Recover Deleted Photos with Gbyte Recovery
If you’re ready to take action, the process is refreshingly straightforward. Here’s how it works in practice:
- Download and install Gbyte Recovery on your computer.
- Select “Photos” as the data type you want to recover.

Step-by-Step Guide to Recover Deleted Photos with Gbyte Recovery - Run the scan—it usually takes just a few minutes.
- Preview the results and pick the images you want back
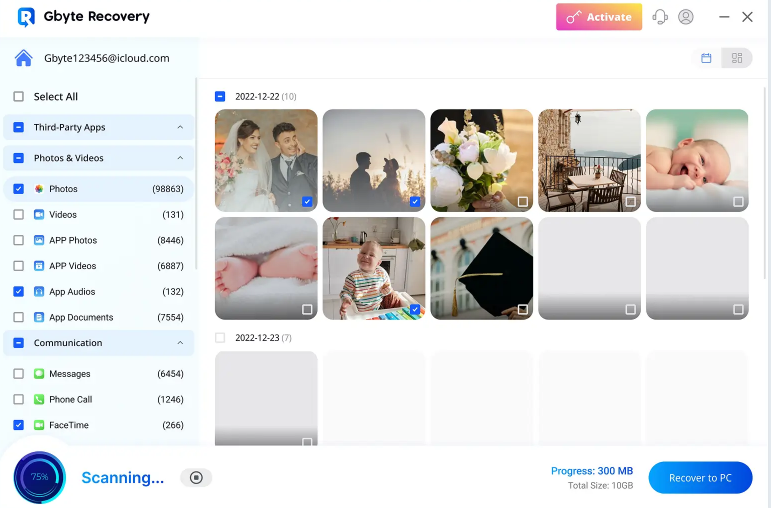
Preview the results and pick the images you want back. - Click recover to save them safely onto your computer.


That’s it. No cryptic steps, no technical jargon. Just a clean path from “gone” to “back again.” Honestly, the first time I saw an old family photo pop back onto my screen, it felt almost eerie—like finding something you thought you’d buried forever. And that’s exactly the kind of experience this best photo recovery tool is designed to deliver.
Alternative Deleted Photo Recovery Tools (If You Want to Compare)
Of course, Gbyte isn’t the only player in the market. Popular names like Dr.Fone, UltData, and PhoneRescue also promise to recover lost photos. Each has its merits—Dr.Fone with its broad device support, UltData with a simple interface, PhoneRescue with flexible recovery options.
Still, most fall short in either speed or consistency. Some drag on with hour-long scans, others bring back messy results full of unusable files. I’ve tried them, and while they work in some cases, they don’t hit the same balance of speed, accuracy, and ease that Gbyte manages to deliver.
Here’s a quick snapshot for perspective:
| Tool | Speed | Backup-Free Recovery | iOS 18/26 Support | Preview Before Restore |
| Gbyte | Fast | Yes | Yes | Yes |
| Dr.Fone | Moderate | Yes | Yes | Yes |
| UltData | Slow | Yes | Partial | Yes |
| PhoneRescue | Moderate | Yes | Yes | Limited |
Tips to Maximize Your Photo Recovery Success
Before you rush off, a few small steps can dramatically boost your chances.
- Stop using your iPhone. Every new photo or app update risks overwriting the very data you’re trying to save.
- Recover sooner rather than later. Time really is your ally in this situation.
- Store recovered photos safely. Don’t just dump them back onto the same device—keep a copy on your computer or cloud.
It might feel like overkill, but these small habits mean you’re not repeating the same heartache a few months down the road.
Conclusion: Regaining Peace of Mind with Gbyte Recovery
Losing your photos after emptying Recently Deleted feels final, but it doesn’t have to be. Apple may not offer a built-in safety net beyond that folder, yet technology has found a way around the wall.
With the right software, recovery becomes not just possible but surprisingly simple. And when every memory matters, that difference can mean everything.