

How To Draw Iron Man

How To Draw Iron Man
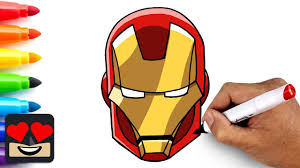
Iron Man is a popular superhero known for his shiny red and gold suit. Drawing Iron Man can be exciting, especially for kids who love Marvel characters. With a few basic shapes and some simple details, you can create your own version of Iron Man. Here is how to draw iron man.
- Start with the Helmet
Begin by drawing an oval shape for Iron Man’s helmet. Flatten the top and bottom slightly to make it look more like a mask. Inside the helmet, draw a faceplate by outlining a smaller shape within the oval.
- Add the Eyes and Details
Inside the faceplate, draw two thin rectangles for the glowing eyes. You can also add lines around the face to show the armored sections of the helmet. These lines give it a high-tech look.
- Draw the Body
Under the helmet, draw a large rectangle or square shape for the chest. Iron Man’s suit is thick and armored, so make the body look solid. In the center of the chest, draw a small circle — this is the arc reactor that powers the suit.
- Sketch the Arms
On each side of the chest, draw the arms using a series of rectangles and ovals for the shoulder, upper arm, and lower arm. Make the arms look mechanical and strong. At the end, draw closed fists or open palms.
- Add the Legs
From the bottom of the chest, draw two legs using long rectangles and shapes for the thighs and lower legs. Iron Man’s legs are also armored, so add a few lines or panels to show the suit’s design.
- Include the Boots and Final Touches
Draw the boots by adding extra details at the bottom of each leg. Then go back and add armor lines on the chest, arms, and legs. These details will make the suit look more realistic.
- Colour the Suit
Colour Iron Man using red and gold. The helmet, arms, and legs are mostly red, while parts of the chest and joints are gold. Colour the arc reactor and eyes light blue or white to show they are glowing.
Also Read: How To Draw An Airplane